- Home
- C++ with Qt Tutorial
- Software installation (MacOS X)
Step 3: Download of Apple XCode for MacOS X
On Apple's MacOS X operating system the C++ programming tools are supplied as part of the official Xcode development environment.
Until MacOS X version 10.6 (Snow Leopard) Xcode could simply be installed from the MacOS X installation DVD which came with every Mac, iMac, MacBook etc. It is usually contained in the "Installation extras" folder on the disc. In this case, no further download is needed and you can continue with the Xcode installation.
With the switch to MacOS 10.7 (Lion) and the advent of more and more MacOS systems being build without DVD drive, Xcode is now supplied from Apple's online application store for free.
In order to open the Mac App store page for Xcode, you can either start the Mac App store application and search for "Xcode", or follow this link to the Mac App store web page for Xcode and clicking on the "View in Mac App store" button:

On a Mac with a current version of MacOS X 10.6 (Snow Leopard) or higher this will start the Mac App store application and display the page for XCode.
From the App Store page for Xcode, you can get Xcode by clicking on the "install" button. You may have to enter a valid iTunes / App Store account and password, but after that, download and installation of Xcode should start automatically.
Step 4: Installation of the C++ development tools
After having downloaded the basic C++ development tools in the previous step the next step is to install the tools on your system, unless the download automatically started an installation.
Now, let's start with the software installation process.
Installation of Apple Xcode for MacOS X
If you have a Mac with DVD drive and MacOS X system disk, you can start the installation by inserting the disk and opening the "Extras" folder on the disk. There you should find an installation program for Xcode.
Just double-click on this program and follow the on-screen instructions. You should take care to write down the installation path for the Xcode tools because the older versions of Xcode usually install to a different directory than the current version for MacOS X 10.7 (Lion), typically a "Development" subdirectory right your systems standard harddrive.
If you downloaded Xcode from the Mac App Store, the download should already have triggered the installation procedure. This is not very different from any normal application installation under OS X.
Step 5: Download the Qt library and tools
After having set up the basic C++ development tools for your system in the previous step, it is now time to install the additional Qt development libraries and tools. These will provide an additional framework which makes the development of modern desktop applications much easier than if we were using C++ alone.

The main Qt website can be found under http://qt.digia.com/ since Qt has been acquired by digia. While you can currently download an evaluation version there, for this tutorial and further open source development you should instead turn to the Qt developer network homepage - the open source version can be used free of charge:

Since version 5.2.1 of the Qt SDK, mobile platforms like smartphones and tablets are fully supported as target platforms.
I will use Qt 5.3.x for the upcoming parts of this tutorial, occasionally updating the tools by either downloading new versions or using the integrated maintenance function.
Unless Qt is updated to version 6, it is usually no great problem to install smaller updates. For this tutorial, the small changes represent no problem.
UPDATE (October 2014):
At the moment, Digia is working on a single, unified Web presence that combines the functionality and content from the official Digia Qt website with that of the open source Qt project website. The new presence which will replace both sites in the future can be found under http://www.qt.io/.
On the download page you can find links for separate downloads of individual components of the Qt SDK. We do not need these at the moment as the SDK download contains all necessary tools. Just select the offline or online installer for the operating system you are using.
There we can download the Qt SDK (software development kit) for Windows, Linux and MacOS by using the links on the download page https://qt-project.org/downloads.

As you can see on the Qt download page, the basic choice for all available versions for the different operating systems is one between the online and the offline installers for each operating system.
In order to have the most flexible options for future software development, my personal recommendation is to download and install most of the available parts of the Qt SDK. Therefore I would advise you to choose the offline installer. This also avoids possible connection problems during the installation of the documentation.
The online installer option will start the download of a smaller program (named something like
"QtSdk-online-win-x86-v1_2_1.exe" in the case of the Windows version of the Qt SDK). Starting this program on your computer after it has been completely downloaded will bring you to the next step in the installation process, the selection of the Qt SDK parts for the final installation.
With the offline installer a larger file will be downloaded to your computer (for Windows this is named something like "QtSdk-offline-win-x86-v1_2_1.exe"). This file already contains all currently available parts of the Qt SDK, so an additional download is not necessary.
Step 6: Installation of the Qt library and tools
Independent of the installer version you chose, each Qt installer will bring up a series of dialog windows after you start the program.
In the newer versions of MacOS X like version 10.9.5 (codename "Maverics") starting the downloaded installer application will lead to an error because the application was not downloaded from the official Mac App Store.
In order to start the installer, you have to hold down the "CTRL"-key (control key) on your keyboard while clicking on the installer file. Then select "open" from the appearing pop-up menu.
After this, you should get a window with a similar message as in the initial error, but this time the window should have a second button that allows you to bypass this message and proceed with starting the installer application.
In Qt 5, all necessary development tools (the Qt library, Qt Creator, Qt Linguist and other software) are already included in the standard installation option, so you can accept the default installation options. If you like, you can chose to install the Qt source code, but it is not necessary for this tutorial.
Simply accept the default settings and the Qt library and tools will be installed automatically.
If you are installing Qt version 5.0.1 or 5.0.2 on MacOS X and finish the installation with the option of starting Qt Creator, you might get an error message concerning the "UpdateInstall" plugin:
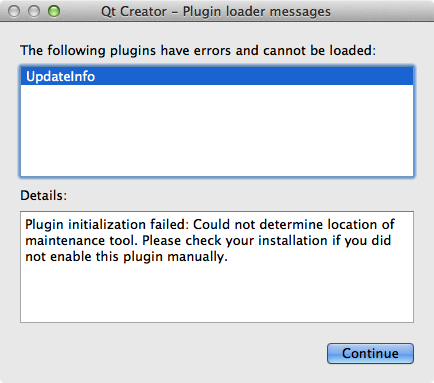
This error is caused by a development-plugin for Qt Creator which is not necessary for the actual usage of Qt Creator. You can simply deactivate the plugin by going to the help menu and choosing the "About Plugins" entry. This brings up a window with a hierarchical list of the installed Plugins and their current status:

Scroll down to the "Qt Creator" section and simply click on the "load" check field for the "UpdateInfo" plugin in order to deactivate it like shown above. After closing the dialog and restarting Qt Creator, the error message should not appear any longer.
Next steps
After the C++ and Qt development tools have been downloaded and installed, you can continue to step number seven for a short test that will confirm if everything has been installed correctly.
Alternatively, if you want to install C++ and Qt on additional computers with different operating systems, you can continue to the next page.
- Home
- C++ with Qt Tutorial
- Software installation (MacOS X)