How to embed a Google+ in your own web page
This is a short description about how to embed a Google+ post into an external web page. I basically followed the steps described by Charlie Southwell in his blog post here.
The only difference was that I did not get the option to see the "embed" code in the drop-down menu for my public Google+ post, so I had to add the code manually.
So here is a short rundown on how to do this.
After sharing a new Google+ post with the public, I discovered that the drop-down menu for this post actually has the option for embedding the post. It seems that this option disappears for a post that you made inside a private community (or shared with a private community).
Standard posts that you share with the "public" group allow you to directly open a window with the HTML code for embedding it into your own web pages. So for these kind of posts, you can follow the steps described by Charlie Southwell or use the steps described below.
Embed a Google+ post using the generated code
If the post that you want to integrate into your own web page is a public post, the drop-down menu for this post - which you can access with the downward pointing arrow/triangle in the upper right of the post - should contain an option for embedding, like this:
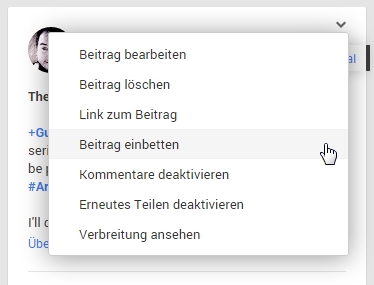
In my case the list of options appears in German as I could not find an option to change the language setting for the display of my stream in Google+. The menu will usually be displayed in your native language, so it might look different for you anyway.
The fourth option from the top of the menu is the embedding option. If you select this, an additional overlay window will pop up containing the automatically generated HTML code for the selected post:
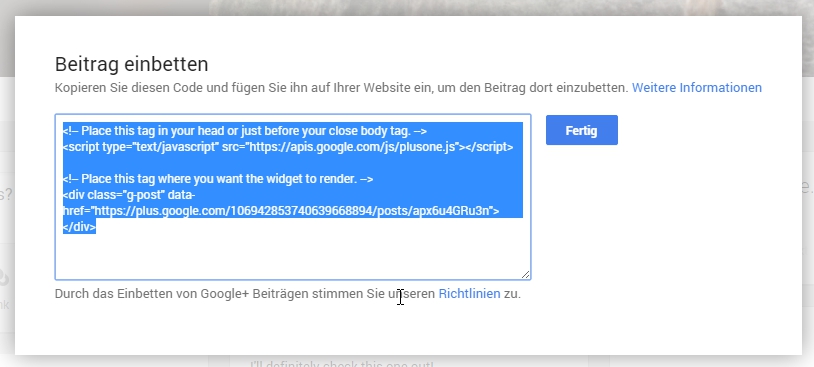
The generated HTML code consists of two parts:
- code for accessing the Google+ JavaScript API file "plusone.js"
- code for displaying the Google+ post embedded into the rest of your page
Both code blocks start of with a comment line that starts with the HTML tag "<!--" and ends with the closing tag "-->". You can copy this along with the rest of the code, but you don't have to insert this into the HTML code of your own page.
Step 1: Copy the generated code
If the drop-down menu for the post offers the embedding option, the first step for embedding the Google+ post into your own web page is to select the embedding option from the menu as described above.
Select the code in the new window if it is not already selected and copy it to your clipboard. You can paste it into a text file if you want to add the post to your own web page later, maybe together with some other posts.
Step 2: Insert the first part of the code into your web page head section
The first two lines of the code contain the reference to the Google+ JavaScript API that is needed to properly display the post.
Open the web page where you want to embed the post in your page editor (or HTML code editor). Navigate to the "<head>" section of the page and insert the first two lines of the generated code there.
If you are using some type of WYSIWYG-editor for creating your web page, you will usually work with different types of content blocks where you do not directly enter HTML code.
In this case, look for a "raw HTML" type of block where you can insert the generated HTML code. If you insert the code into a normal text block, you will only see the code, but the code will not be interpreted by the browser, so you will not see the Google+ post.
Step 3: Insert the second part of the code in your content section
After inserting the first part of the code into the head section of the page, copy and paste the second block of the code (that contains the link to the post) into the content section of your page wherever you like.
As before, make sure that the HTML code is put into a "raw HTML" block if you do not use an HTML editor to create your page.
Once everything is in place and the HTML code can be properly executed, build and publish your page.
Embed a Google+ post just using the link to the post
If your post was written in or shared with a private community, the drop-down menu for the post will look a little different. You will not get the "embed" option, so the menu will look something like this:
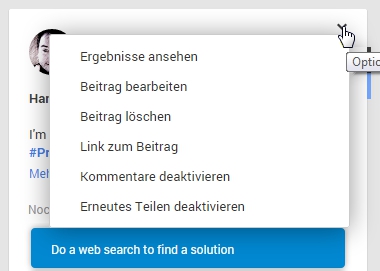
Here the fourth option from the top is for the link to the post, so you will not get the automatically generated HTML code.
You can still embed the post into your own web page by manually adding similar HTML code and using the post's URL.
Step 1: Get the URL for the Google+ post
In the Google+ post, select the "link" option from the drop-down menu. This will open an additional window where the URL to the post is displayed and already selected:
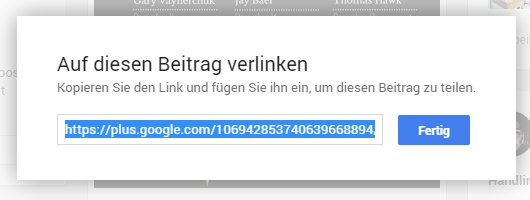
You just have to hit CTRL+C (on Windows) or CMD+C (in MacOS) in order to copy the link to your computer's clipboard. If you do not directly paste it into your page code you should insert it into a temporary document in order to copy it later.
Step 2: Add HTML code to the <head> area of the page
First you need to put a reference to the Google+ JavaScript API into the "<head>" area of the web page where you want to embed the Google+ post (this refers to the HTML tag section).
Here you need to put in the following HTML code:
- CODE: Select all lines of code for copying
<!-- Place this tag in your head or just before your close body tag. -->
<script type="text/javascript" src="https://apis.google.com/js/plusone.js"></script>
You can leave out the first line as this is just a comment, but the "<script ...></script>" section has to be in there.
Step 3: Add HTML to your page content section and customize it
The last step is to add some HTML code to your page somewhere within the content section where you want the Google+ post to appear.
So you need to add a raw HTML block to your page, or directly add something to the HTML source code for your page, depending on the tool that you use in order to create your HTML page.
Inside the HTML section where you want to embed the Google+ post, add the following HTML code:
- CODE: Select all lines of code for copying
<!-- Place this tag where you want the widget to render. -->
<div class="g-post" data-href="YOURGOOGLEPLUSURL"></div>
As in the code for the head section of the page, you can leave out the comment line. What you definitely need to do though is to replace "YOURGOOGLEPLUSURL" with the URL that you copied from the original Google+ post, which should be something like "https://plus.google.com/106942853740639668894/posts/YG6JjUWKTur".
Once you save the page with this code (and the code in the head section), the embedded post should look similar to this:
And that's really all. Happy embedding... :)