- Home
- C++ with Qt Tutorial
- Software installation
Learn C++ Programming with Qt, Part 000:
Software Installation and Introduction
Welcome to the start of my C++ programming tutorial for beginners! This tutorial assumes that you don't know much about programming yet, so it includes a bunch of useful background knowledge along with the programming stuff.
As you might have noticed, this part of the tutorial starts with the number zero. For programmers this is the first natural number, whereas mathematicians normally use one as the first number.
This is due to the fact that our computers are based on binary logic where zero is the first usable value.
In mathematics, people were already counting things and doing calculations long before there was the need to represent "nothing" with a numerical value.
The fact that zero is used as the first (natural) number gets important when it comes to programming with index numbers etc. More on this later in this article series.
At the end of this series of tutorials, you should be able to write your own programs from scratch, solving different problems with the help of your own software.
Before we start with the actual tutorial, the following steps are needed for preparation, independent of the operating system:
- get hold of a PC, Mac or Raspberry Pi as your programming platform
- optional: create an additional user account or desktop setup for development
- download and installation of the C++ development tools
- download and installation of the Qt library and development tools
- testing of the development setup
It might take some time to get these steps done, but if done properly you won't have to do it again unless you want to install the development tools on a different system. After that we can start with some real programming.
By the way, you can use the links in the list above to jump down to the detailed description for each step below.
This is an updated version of the software installation guide, where I'll try to stick to the basic steps that will still need to be done fof future software releases. Since there have been some substantial changes for Qt development in the last few years, it has become more and more difficult to keep the installation guide up to date.
For more details, you can have a look at the installation procedure for Qt version 5.3 (and earlier operating systems). Just be aware that the current installation procedure is a little different in some areas.
Step 1: Get a PC as programming platform
If you are reading this article with a web browser on your own PC or notebook computer, you can skip this step and continue with step 2 of the preparation phase.
However, if you are reading this article on a mobile plattform or on a computer that you don't have regular access to, the first thing to do is to get yourself a computer of your own. Alternatively you can talk to the person who owns the computer and get an arrangement for an additional user account and time to use for programming.
For this tutorial you only need a standard personal computer (PC), either a desktop, tower or laptop. It does not have to be the latest model. It can be a PC running Windows (XP, Vista, Windows 7, 8.x or 10), Linux or a Mac with MacOS X. You can also use a Raspberry Pi with Raspbian or Ubuntu as long as you use a graphical desktop environment.
Step 2: Create an additional user account or desktop environment
This step is completely optional.
If you are using your own private PC for this tutorial and if there are no other people using it, you can use your standard user account.
However if you are not using your own computer or if your family computer does not yet have separate user accounts for all of its users, I recommend to set up an additional user account for programming and software development.
This makes it easier to separate the software development from other activities with your computer. If you set a password for the development user you can also avoid that your program code is changed by another user (accidentally or on purpose).
At the same time, this allows you to set up a separate desktop environment especially for programming, with links to tools etc. that you do not need outside of software development.
Alternatively, if you are already using virtual machines, you can also set up a new virtual machine especially for programming. Unless other people use the same virtual machine, you don't have to create additional user accounts on it. A good and free option for that is VirtualBox, which is an open source virtualization solution currently maintained by Oracle. You can easily install Linux inside a VirtualBox virtual machine.
As a last option, if you are using a software add-on for your operating system which allows you to create separate virtual desktops, you can use this to create a desktop environment for software development. Then, when you want to program, you can just switch over to the preconfigured development desktop.
Step 3: Download and install the C++ development tools
After organizing the necessary programming hardware (PC, Mac, notebook computer, Raspberry Pi) and (optionally) setting up your development user account the next thing we need is the basic software for programming.
If you are going to use a separate user account or virtual machine for programming, you should download and install the development software from this new user account or virtual machine.
In any case, you need an internet connection for your machine. Since the tools and libraries have grown quite a bit over the years, a decently fast connection is preferable.
The other thing you need are administrator rights for your machine, so that you can actually install the downloaded software.
In this tutorial I have chosen the C++ programming language. C++ development tools are available for all mayor operating systems. Additionally I have chosen to use the Qt libary with the corresponding development environment.
With this combination the programs in this tutorial should run on Macs with MacOS X as well as PCs with Windows or Linux, even when using advanced features of the operating systems, such as graphical frontend functions.
While a final, compiled program will not be able run on a machine with a different operating system, the same source code can be used to compile and build the same program on a different plattform.
First we need the basic compiler, linker and debugger with the additional C++ function libraries. Depending on the operating system which you are using there are different options for the current Qt Version 5. The supported platforms can be found on the Qt developer network website under the following link: https://doc.qt.io/qt-5/supported-platforms.html.Following the currently supported and officially tested options, you can choose between the following according to your computers operating system (click on the relevant entry for your system in order to jump to the according part of this article):
- MinGW for Windows (alternatively Microsoft Visual C++ for Windows)
- XCode for Mac OS X
- GCC tools for Linux / Raspbian
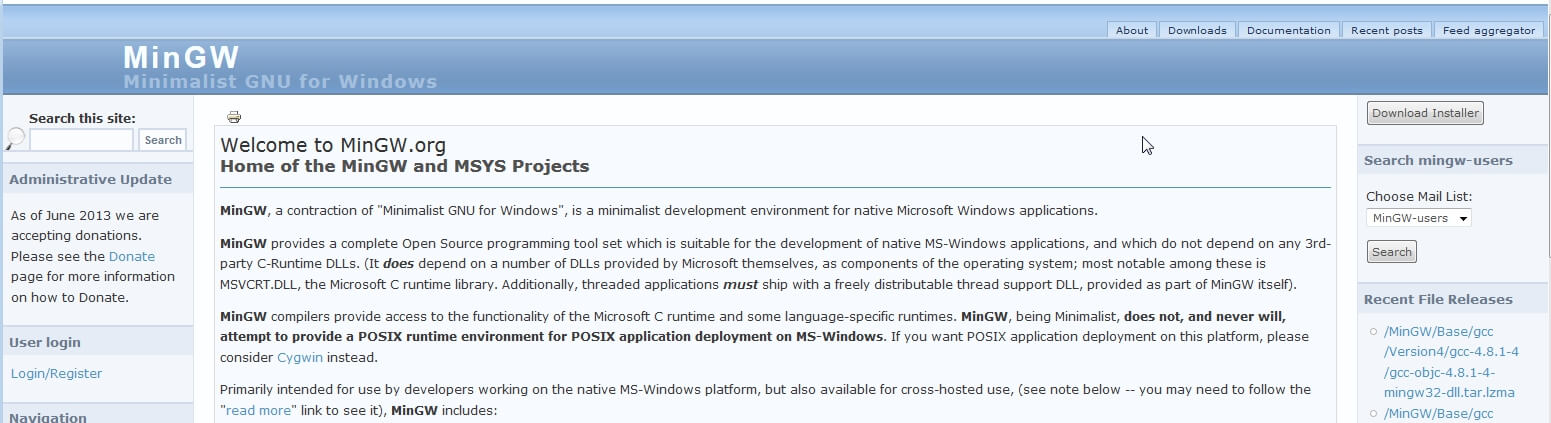
MinGW C++ tools for Windows
For C++ development with the Qt development tools on Microsoft Windows systems, the easiest way is to use MinGW. It provides all necessary functionality, and can be downloaded and installed along with the rest of the Qt development tools - so you can skip ahead to the download and installation of the Qt development tools.
If you want to install MinGW separately (maybe even parallel to Microsoft Visual Studio C++), you can also download a separate installer from the MinGW website:
When you go to the "Downloads" section of the page, you will be automatically redirected to the MinGW code repository on the Sourceforge website:
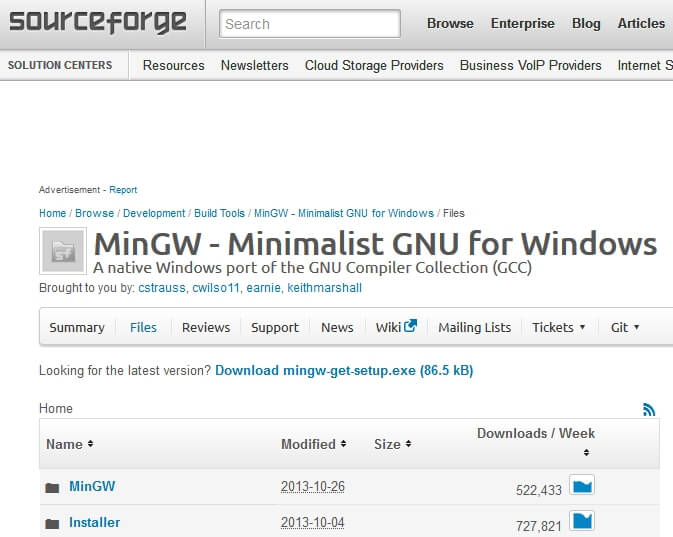
You can find some descriptions further down on the Sourceforge page. The installer packages can be found in the "Installer" subdirectory. The rest contains the source code and documentation for MinGW.
Microsoft Visual C++ for Windows
The Qt development tools also support Microsoft Visual C++ in its current versions. For development from within the Qt programming environment, this is no different than using MinGW (other than maybe creating slightly more optimized code for Windows systems when compiling your application). It does however give you additional options for C++ development when you are not using the Qt library and tools, but want to create a more Windows-specific kind of application.
If you want to have that option, you should first head over to the info page about the currently supported platforms for Qt. This lists the supported compilers for the different versions of Windows ("MSVCxxxx" - Microsoft Visual Studio C++) a little down on the page. Choose one version for your operating system (just use the most recent one if you are not sure which one to use) and head over to the Microsoft Visual Studio Express (now called Community Edition) homepage:
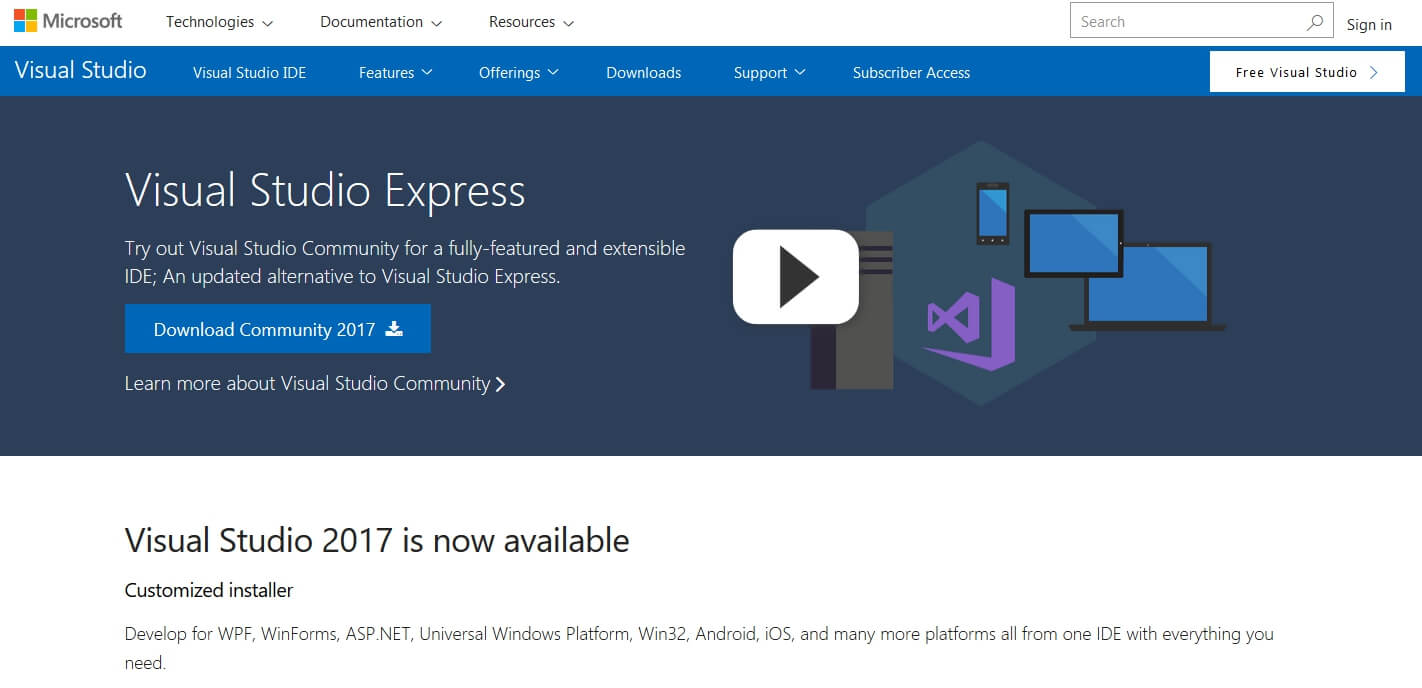
Unless you want to start a company and do full time development of Windows Applications, the free-of-charge "community edition" of Visual Studio is all you need. The download button will automatically start the download of a small downloader application that needs to be executed in order to start the selection of the software components you want to download and install. After the selection, the Visual Studio community edition software will automatically be downloaded and installed on your computer.
In contrast to earlier versions, where there were different installer programs for different programming languages, the programming language can now be chosen along with the individual packages for the installation. Along with the C++ tools and the basic Visual Studio IDE package, you can add other packages if you want to use Visual Studio for Windows application development without necessarily using Qt later on.
XCode for MacOS
If you are using an Apple Macintosh computer (iMac, MacPro, MacBook etc.) with MacOS X, you need to install Apple's XCode development tools from the official Mac AppStore. These include all the basic compilers, linkers, the XCode IDE and other tools for the development of MacOS and/or iOS, tvOS, watchOS applications.
XCode can easily be found by simply searching for "xcode" within the Mac AppStore application on your Mac.
(...image...)
Apart from administrator rights for your machine (for the software installation), you also need an account for the Mac AppStore that allows you to download software in the first place. Other than that, just search for XCode in the AppStore and download the official version from Apple. The installation will start automatically after everything has been downloaded.
If you want to use XCode for development outside of the Qt IDE, you should take a closer look at the different additional tools and online documentation that can be downloaded from within XCode itself. This is useful for more specific MacOS, iOS etc. development (which won't be "cross-platform" any more).
GCC for Linux / Raspbian
On Linux systems - which includes Raspberry Pi's Raspbian as it is derived from the Debian Linux distribution - the basic GNU Compiler Collection (GCC) is often installed by default. You can check this by opening a terminal window and just entering "gcc" after the command line prompt. When you hit the enter key on your keyboard, gcc will print out some information about its required and optional command line parameters, similar to this:
(...image...)
If you get an error message instead, telling you that gcc wasn't found, you need to install the tools. Depending on the Linux distribution you use, there are different applications for software installation management and online app stores. Usually you should find a software installation tool as part of the default system management tools in your OS menu somewhere. Just open it and search for "gcc". This should bring up a page or list entry where you can select and directly download and install the gcc tools. It should be located in the "development tools" group (or a similar one related to development and programming).
Alternatively, most Linux distributions also come with the "apt" command line tool, with preset links for the official software repositories for your distribution. The following commands (along with entering an administrator password) should result in downloading and installing gcc on most systems:
sudo apt-get update
sudo apt-get install gcc
Once the download is complete, entering "gcc" again after the command line prompt should now show you the command line options for gcc.
Step 4: Download and install the Qt library and development tools
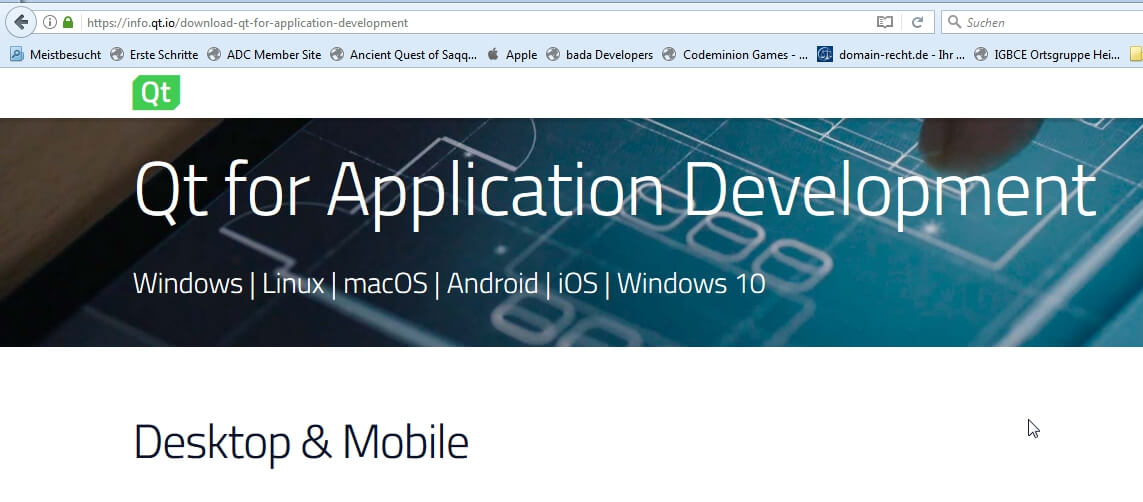
In order to download and install the Qt library and development tools, you need to go to the Qt.io website.
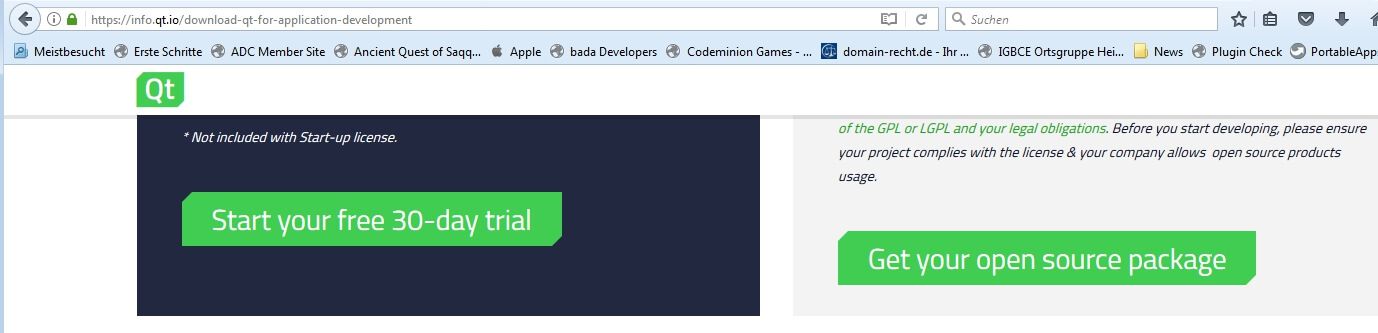
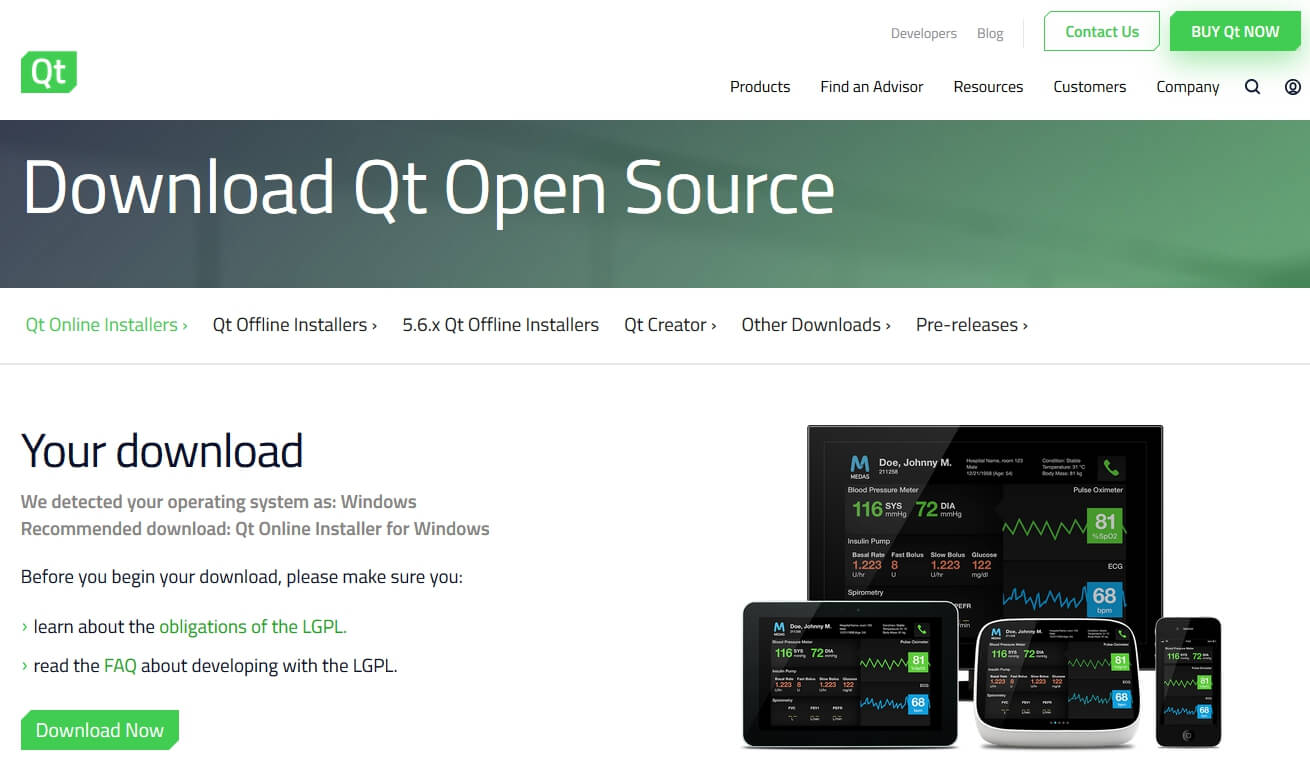
You can find the open source version of Qt (along with the commercial version) on the "Qt for application development" page (sadly it's currently a bit hidden) that is linked from the Qt licensing page. Choose the download for the open source version using the button labeled "get your open source package".
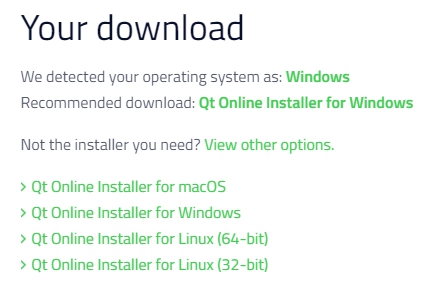
This will open another download page with a download button, which in turn will start the download of an online installer for the operating system you are currently using:
If you want to download a version for a different operating system or even the complete offline installation package, just scroll a little further down on the same page (or use one of the navigation links above) and click on the corresponding link for the installer of your choice.
Both the online and offline installers will initiallly prompt you to enter a Qt developer account as part of the installation procedure, but you can (and should) just skip this step initially. You can always create a developer account later, especially if you want to use Qt for professional development. Until then, it's not necessary.
NOTE: For any operating system, you should set the additional installation option for also installing the examples. This is not only useful for testing the software installation, but also for providing a hands-on reference for a lot of different Qt programming topics.
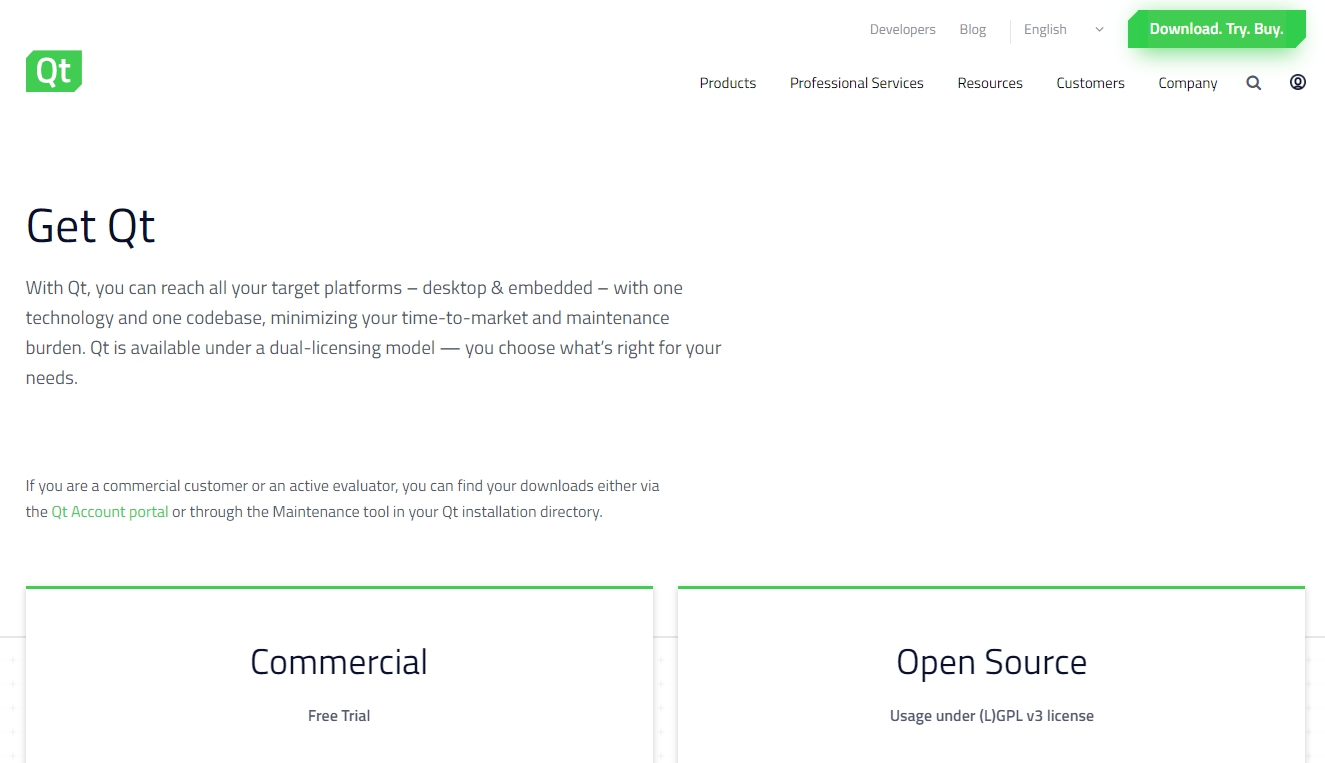
UPDATE 08/2018:
The Qt.io pages have changed again. The different product options now all lead to the same download / purchase page:
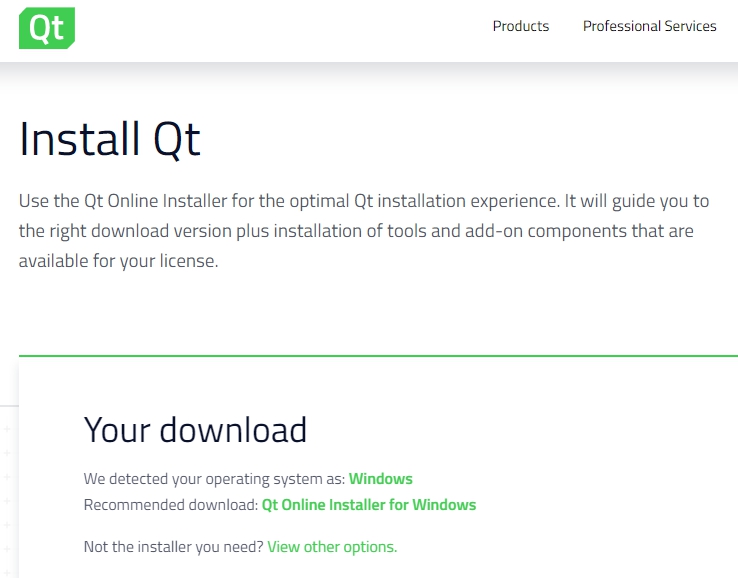
If you choose the open source option there, the browser will open a new page with the download link leading to the Qt version for the operating system you are currently using:
As you can see, the default option is the online installer which requires a constant internet connection during the installation process. In contrast to earlier versions of the download page, opening the list for other installation options does not give you access to the offline installer any more:
If you need the offline installer, e.g. for installation on systems which do not have a constant internet connection, you now have to go to the Qt download archive pages which are found here:
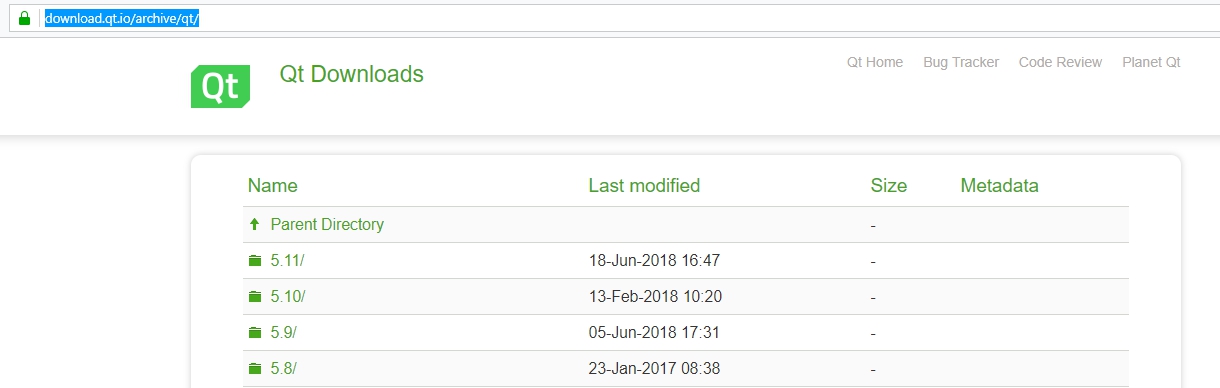
On the download archive page, simply chose the most recent version of Qt (version 5.11 in the screenshot above). After choosing the main version of Qt, you may have to choose a sub-release version:

Again, just select the most recent version here. Within the sub-release directory, you should then see the list of available installer applications for this version of Qt:

The offline installer for your operating system (for the open source version of Qt) can be easily recognized since the installers follow the same naming pattern:
qt-opensource-<OS>-<CPUARC>-<VERSION>.<EXT>
Here "OS" stands for one of the three operating systems (windows, mac, linux), "CPUARC" stands for the CPU architecture (x86 or x64), "VERSION" for the selected Qt version number (main and sub release numbers) and "EXT" stands for the file extension ("exe" for Windows, "dmg" for MacOS or "run" for Linux).
You can copy the offline installers to a USB stick or other mobile storage media and use them on multiple machines whithout having to download all installation components multiple times.
Windows systems
For normal Windows systems, you should be able to just download the Qt development tools and install them using a local administrator account on your machine. If you are using Windows "10S" however, the system will not let you install software which wasn't downloaded from the official Windows App Store. So unless the Qt development tools become available in the official store or you upgrade your machine to a standard Windows 10 license, you can only use a different machine - or use a virtual machine instead (though I currently don't know if Virtualbox, Parallels Desktop, VMware or a similar virtualization is available in the official Windows app store).
If you want to install MinGW as part of the Qt development tools download, remember that you have to select the additional option in the Qt installer. If you want to use Microsoft Visual Studio C++ instead, make sure that it is installed before you start the Qt installation.
Download and installation of the Qt development tools and libaries will take a while, but if you used the right settings, it will automatically be configured for usage with MinGW or Visual Studio in the end.
MacOS systems
Similar to using Qt with Visual Studio on Windows systems, you first have to install Apple's XCode development tools before you start installing the Qt development tools and libaries. If you have done that, Qt will automatically be configured to use the XCode tools from within the Qt IDE.
Due to MacOS security restrictions though, you have to start the online or offline installer application for Qt using a right mouse-click and selecting "Open" from the context menu:
This will allow you to bypass the MacOS warning message about the application not being signed by an offically registered developer (since it wasn't downloaded from the official app store). After that, the installation should start normally.
Linux / Raspbian systems
While a lot of current Linux distributions offer the Qt IDE and Qt development tools as packages available in their standard software "app store" applications, the packages are usually not the most recent versions of Qt. If the gap between the version numbers is not too wide (e.g. version 5.3 is offered in the app store when you can already get version 5.4 or 5.5 on the Qt website), the differences are usually small enough and the coding is mostly identical on both versions. However, if a new major version just came out (completely new version number like 6.0), there might be bigger functional differences. The changes are usually mentioned on the Qt website, in the change history for the new version and usually in the news posts for the new version.
If you are not sure which version to use, just go for the most recent, stable version you can download from the Qt.io website.
Once you download one of the installers for Linux, you have to check if the installer is executable (also if you downloaded an archive file and unpacked it):
If the installer is not executable, you need to set the correct file permissions to make it executable. This can be done using the "chmod" command:
Depending on the permissions of your current Linux user, you might have to execute the "chmod" command with additional administrator permissions using the additional "sudo" command.
Once the file is executable, you can start the installer - preferably by using the "sudo" command and starting it with administrator rights:
The installation wizard then walks you through a couple of dialog screens, prompting you for some installation options. Once everything is set, the software is then installed accordingly.
Step 5: Testing the development setup
Now that we finally have set up our programming tools it is time for a short functional test before we start with the core of the programming tutorial.
If the C++ development tools and the Qt SDK have been
installed correctly, it should be possible to start the Qt IDE and compile and run one of the included examples.
The starting
point for this test as well as for all future programming activities is
the central Qt IDE (integrated development environment) application
which is called Qt Creator:
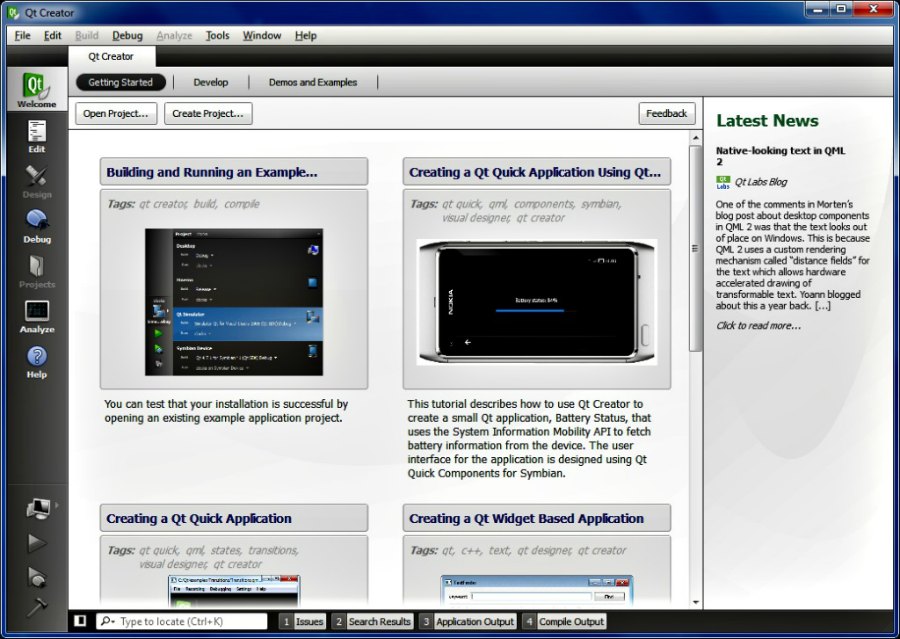
I will explain the different parts of the Qt Creator development environment in the next part of my C++ programming tutorial.
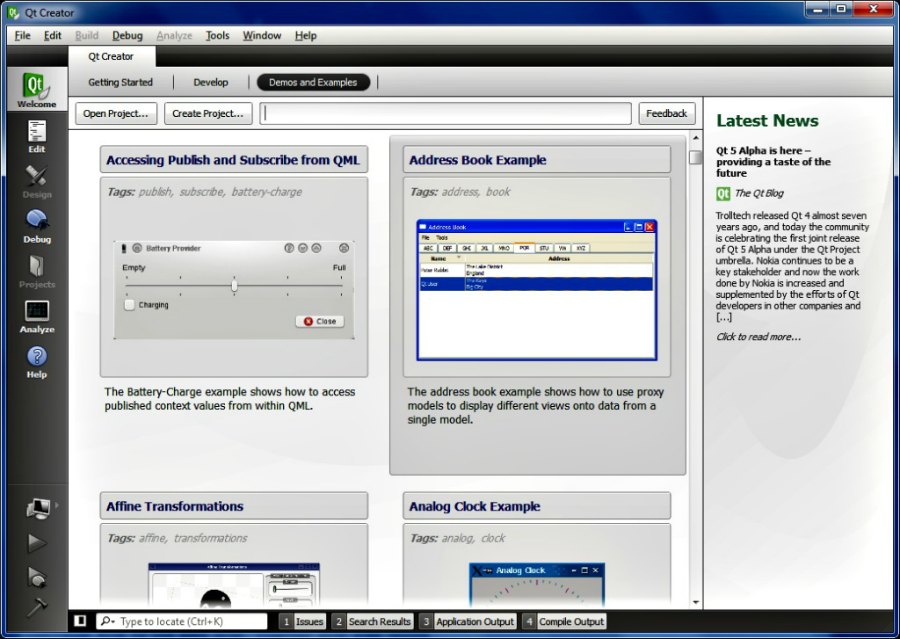
For now, let's go to the "Qt Welcome" screen and switch to the "Demos and Examples" subsection. Here, scroll down a little in order to find the "Address Book Example":
After selecting and confirming this example, a new window will pop up where you can set the target options for the new project:
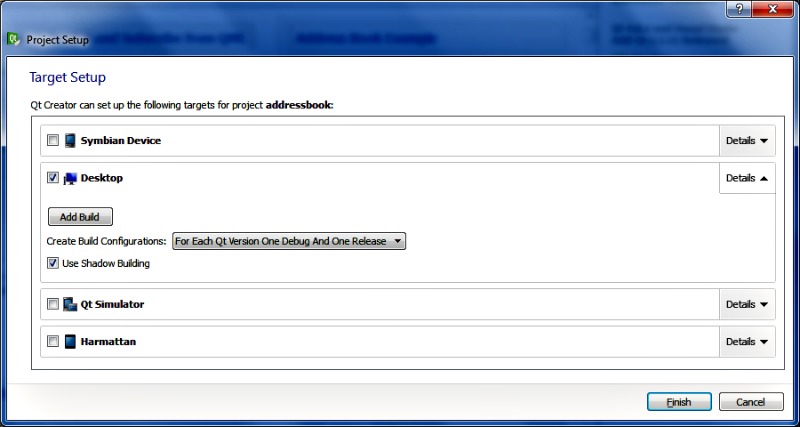
Just use the default options here (target "Desktop") and click on the "Finish" button.
After a short wait the pop up window will disappear and the Qt Creator will switch to a display with the new address book project in edit mode.
By clicking on the green triangle button or selecting the appropriate option from the Qt Creator menu, the address book example application will be compiled, build and started.
If the installed C++ and Qt tools work correctly, you should see the main window of the address book application:
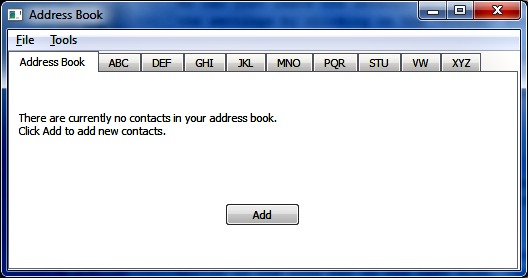
Since this is the first start of the application, it will display a message stating that no contact addresses have been entered yet, so no data can be displayed.
By clicking on the "Add" button, you can bring up an additional window where a new address can be entered:

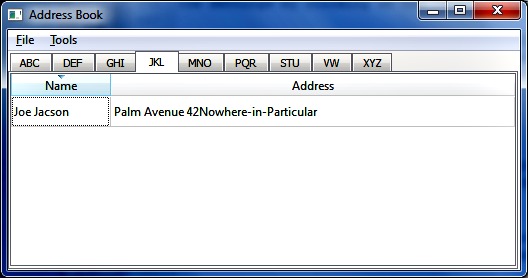
After entering a new name and address and clicking on the "OK" button, you can select the relevant alphabetical character tab in the main window. Now you should see a list containing the address you just entered:
If everything works fine, you can play around with the example application. When you are done, simply select the "Exit" option from the file menu.
If
the application did not start and you get some error message, please
read the error message carefully. Normally the error message should give
you some idea what to change in order to get a positive result.
If
the Qt Creator does not start, you should check the installation steps
described above. Maybe you missed a step or completed one step earlier
than it should have been done. If in doubt, simply uninstall the Qt
development environment first and then uninstall the C++ development
tools. After that, reinstall the C++ development tools first and then
the Qt development environment as described above.
I cannot
explain all possible error conditions and how to fix them here. Some
errors might be tied to the Qt development environment, others may be
based on the C++ tools which you are using.
If reinstalling the C++ development tools and the Qt development environment does not fix your problem you should look up the error and/or relevant key words on the help sites and forums for both in the web.
Ready for programming
Now that all necessary development tools have been installed, we are ready to go.
In the upcoming parts of this tutorial, we will have a closer look at the "Qt Creator" IDE before diving into basic C++ programming and getting into Qt development later on. See you there...
- Home
- C++ with Qt Tutorial
- Software installation